
How to Sell Using Amazon FBA for Beginners? Easy Step by Step Guide to Start Selling on Amazon Fast
Amazon is the largest online shopping mall. As of 2018, it’s estimated that 50%+ of US households use Amazon Prime (free shipping service offered by the company). It’s quite remarkable actually. Jeff Bezos became the richest man on the planet surpassing Bill Gates. Looks like Amazon is doing many things right.
Given their incredible growth and scale, no wonder so many businesses jump on board to take advantage of what Amazon has built. And what they’ve built, is simply the largest ecommerce search engine on the planet. It’s not Google and YouTube search. On Amazon, people search to buy! Which makes their traffic extremely valuable when using their PPC platform.
Is Amazon the Right Choice for Me?
That depends. We cover a lot of marketing and business startup models here at Free Marketing Zone. Why should you go after Amazon, instead of other ways to make money, like affiliate marketing or regular PPC?
I believe one compelling reason would be this. Once you get rankings for your chosen keywords, you get sales based on Amazon’s search algorithm. Meaning natural rankings. It’s like SEO within Amazon. You don’t have to spend extra money, and your product may last for years. So you work hard once, and reap the rewards for months.
I mean, who wouldn’t want to make extra $5,000 or $12,000 a month without much work?
Of course, there’s always work involved. But compared to active grinding for income like with dropshipping or CPA marketing, Amazon business seems very attractive.
How Much Money You Need to Start Selling on Amazon FBA?
It’s important to note one drawback of Amazon FBA. And that is initial cost.
You can start affiliate business for next to nothing if using free promotion methods. Even with paid traffic, $5/day cost is possible when starting out. On Amazon FBA, you have to devote $1,000 to $2,000 to start with one product. (There is an option of using retail arbitrage, which we’ll cover below. In that case, you can start with less than $100 bucks.)
In some cases, manufacturers won’t budge and you’ll need to buy 1000 units min. order. It can result in $3,000 to $5,000 initial costs. But usually, I would say, you need at least $1,500.
First product batch will most likely cost you somewhere around $1000 USD. And then add shipping costs (depending on weight) of ~$300 or so.
So better do that product research right 😉
In any case, be prepared & have min of $1,500 for your first test.
Should I Incorporate? Can I Sell on Amazon as Individual?
That’s a quite common question many people ask before selling on Amazon. What legal structure should I use?
I’ll say this. In short, when you’re just starting out and don’t have a lot of money to invest, don’t think about incorporating. Start as sole-proprietor/individual. It costs nothing, and you don’t need to go through legal trouble initially spending hundreds of dollars. Only when you’ve made enough (I would say, $2,000/month stable profits), go ahead and incorporate.
Each country has their own rules and costs, so dig that up yourself.
In the US, it’s pretty cheap. You can create LLC for a few hundred bucks. Wyoming doesn’t disclose shareholders or directors publicly, so might be a good choice. Nevada is pretty protective as well. Do your research.
But if you do incorporate, setup LLC (Limited Liability Company). As the name suggests, your liability is limited. If someone goes after your company, they can’t touch your personal assets (house, car, personal savings, etc.)
With sole-proprietor, you are liable. So if you sell some dumb kids toy, and a kid chokes on it, parents can sue you. You may lose everything.
In reality, it’s highly unlikely. So don’t worry about it initially. (Maybe choose safer products to begin with…) But once you make some money, definitely get an LLC (or LTD in other countries).
Retail Arbitrage vs Private Label
What is retail arbitrage? It’s essentially when you buy a discounted product from your local store (Walmart, Target) and sell it on Amazon FBA. The way it works is this:
- You find super cheap product in your local store
- You check the price on Amazon
- Calculate rough profits you can make from selling
- If it pans out, you buy 10 or 20 units
- Either ship to Amazon or sell from your own house
That’s essentially it. No large investment is required.
Note: It works if you sell in the Amazon marketplace that you live in. For example US, UK, CA, India and few more… If you’re selling in US, but live in Netherlands, then it’s not recommended due to customs and high shipping fees.
What’s private label?
This is what most people use to sell successfully on Amazon. It means taking an already manufactured item, slapping your label on it and selling it as your own.
There are 7 figure Amazon businesses that do just that. No rocket science.
A lot of times you don’t even need to do that. Some products don’t really need unique label. Like some disposable plastic bags. But if it’s electronics, clearly differentiating yourself is important. Not just to look more attractive to customers, but also to deter listing hijackers.
Individual vs Professional Plan
Ok, let’s say you’re ready to roll with Amazon FBA. Now, what are the steps to go through?
Well, first of all, determine what plan you’ll use. Amazon has 2: individual and professional.
Individual plan charges $0.99 extra per item sold. Professional plan has $39.99 monthly fee. If you start with few items, it makes sense to jump on individual plan to save money. However, be warned. I’ve started on individual and when I needed to switch to professional, Amazon disabled my listing. It was Christmas time. It took 4 weeks for my account to switch to pro and activate the listing no matter how many emails I’ve sent. Imagine losing all the potential of the best-selling month of the year, because of this! Therefore I’d suggest going with professional plan right off the bat.
The main reason why pro is better – you can’t use Amazon PPC if you’re on individual plan. All the benefits like creating promotions are out of your reach. And you definitely will want to use coupons, giveaways and other goodies.
Step by Step Guide to Selling on Amazon FBA
So you’ve decided on the plan and ready to begin? Let’s do it.
First, signup for Amazon Seller Central. It’s where you’ll create your account. This is your dashboard. You’ll be able to create your listings and a shipping plan from here. But before you do, we need to discuss Amazon’s restricted categories.
Restricted Categories on Amazon
Never heard the terms like: “gated categories“, “restricted categories“? Then let’s go over them quickly.
There are many Youtubers or “gurus” talking about this. Some even sell services to get you “ungated” from these categories. It’s BS.
In a nutshell, restricted category doesn’t mean you can’t sell in it. It simply means there are certain requirements you need to meet in order to be eligible to sell. And it’s not that hard. For instance, my first product was in medical category. I had to provide FDA registration from a manufacturer and an invoice. That’s it. They gave me these by email and I was “ungated”.
Ideally, you may want to avoid them, but better yet, take a look yourself on what amazon requests when selling in each category and determine where you want to sell.
Product & Competitive Research
Do you know what products you’re going to sell? If not, then do your competitive research first. Even if you’ve already chosen the product, are you sure it’s going to sell? What if niche is too competitive? So let’s do the research first.
But how you may ask.
There are few tools out there. Here are the most popular ones:
There’s a monthly fee for each. But you can cancel after first month to save some cash. You just need to find one product and these tools will pay for themselves very quickly.
Both tools are great and have powerful features. Choose the one you like more and get a subscription.
Inside, you can search Amazon’s product database based on multiple criteria. Category, price, monthly sales, revenue, review count, rating, weight, etc.
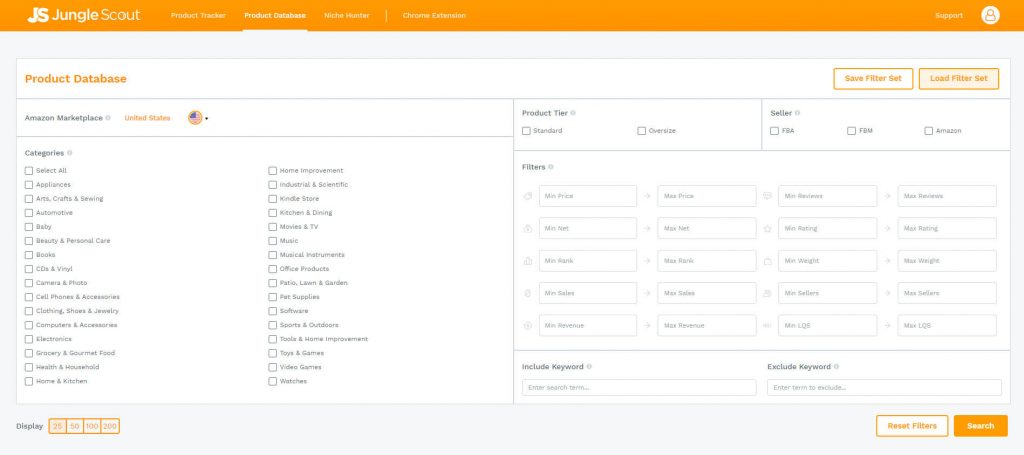
If you find a product with low reviews and decent monthly revenues, go to Amazon.
Now Jungle Scout and Viral Launch have Chrome extensions that they sell. These extensions allow you to scan Amazon listings and display reviews, estimated sales, revenues, and so on for each product.
So once you’re on Amazon, type in the main keyword that describes the product you’re selling into a search field. Let’s say: “wireless charger”. Now click your chrome extension to load it on the page:
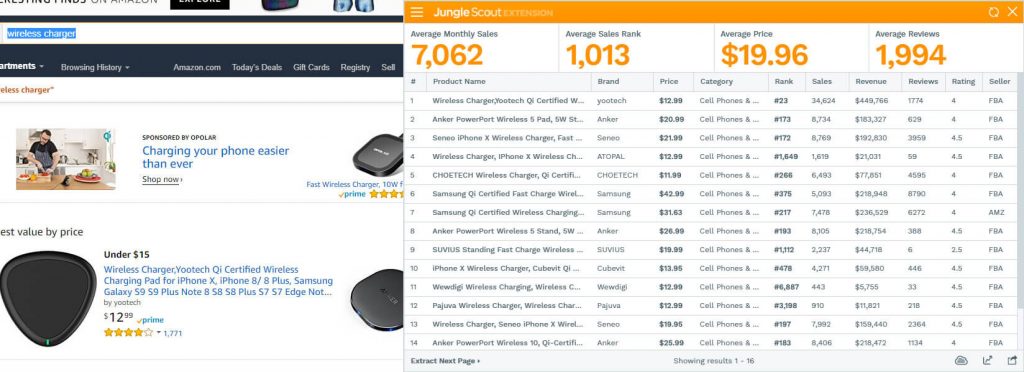
As you can see, revenues are insane, but so is the competition. 1,994 reviews on average for the product on the page. Probably too competitive.
Let’s take another example, type in “urinal cake”.
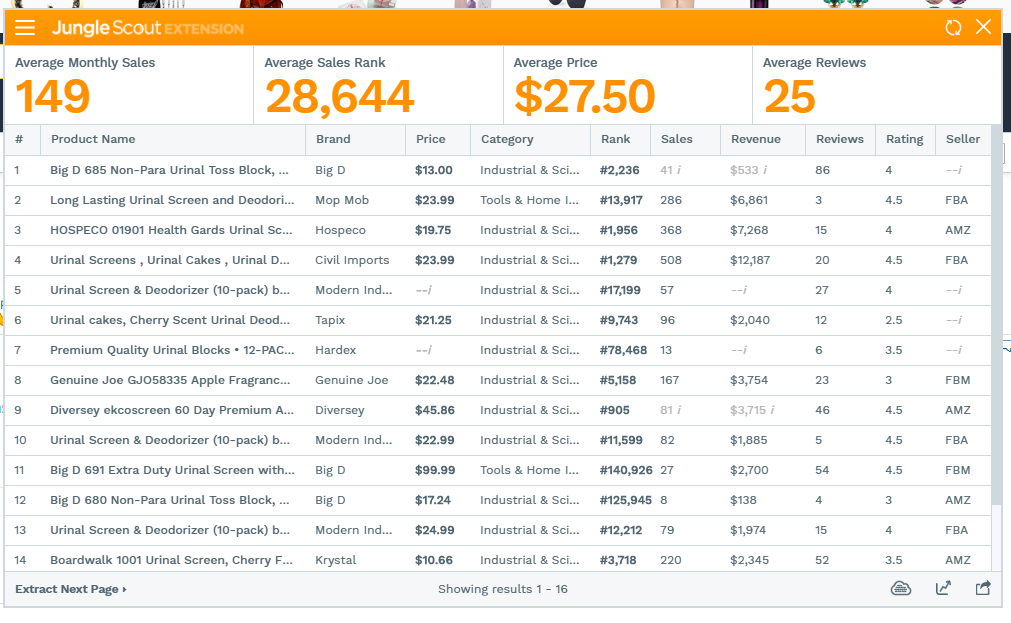
This is much more doable. Average review count is 25, which is low. Some say go below 50 reviews, others say below 200 is fine. You’ll hardly find product with <10 reviews and few grand a month in revenue. In this example quite a few competitors make over a thousand a month. That could mean $300 profit each month. Not much, but this could get you started.
Calculating Costs and Estimating ROI
Let’s take this same product for example and calculate how much Amazon would charge us for it? What you want to do, is find the exact same product on Alibaba and see the price.
Let’s say we take this one from Amazon:

And after typing in “urinal cakes” into Alibaba.com, we find these suppliers:
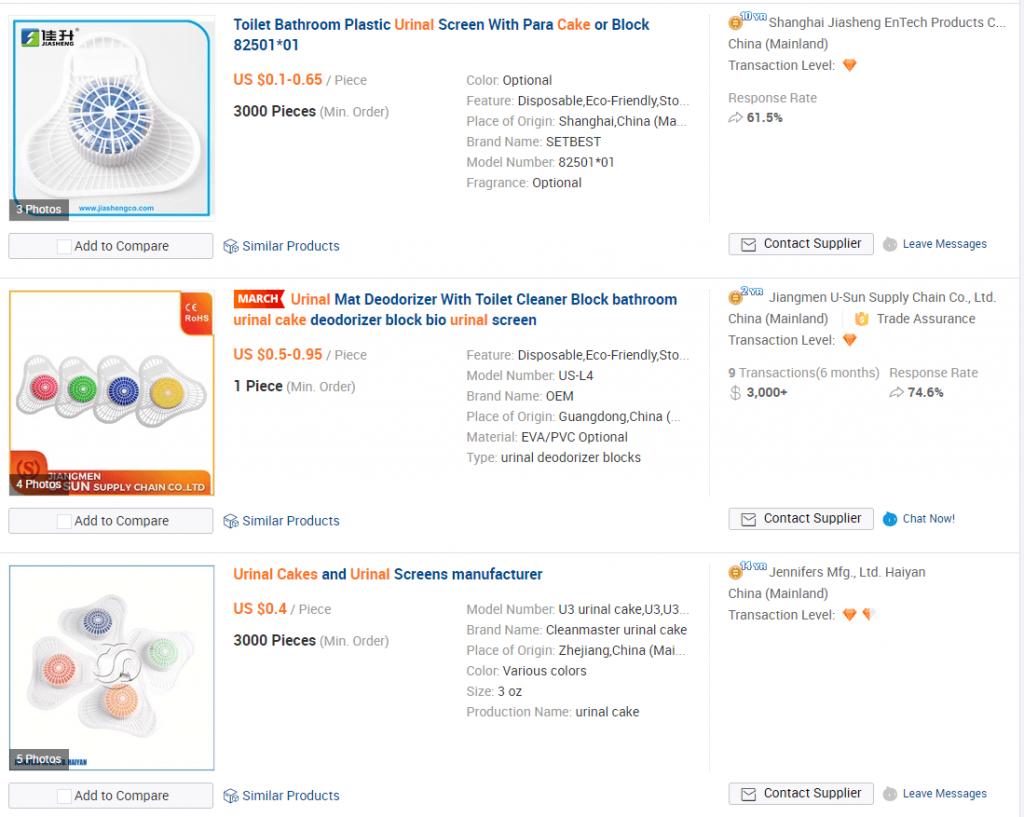
It’s pretty much the same thing. So now, you have much better understanding of what it costs.
Our competitors are selling it for $23.99 for the pack of 12. On Alibaba, one costs from $0.1 to $0.95. The larger the MOQ (minimum order quantity) the cheaper it gets. You always negotiate. Let’s take the average, $0.40 apiece. Multiply that by 12 and you get $4.8 for 12 units.
Now go to Amazon’s FBA calculator:
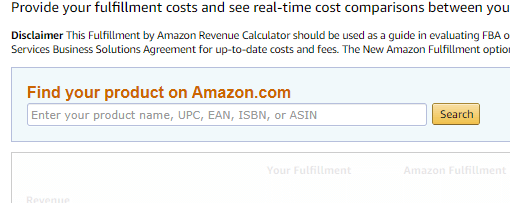
You’ll need to enter the ASIN (Amazon Standard Identification Number) of your competitor into the search field. Where to get the ASIN? Go back to your search results page on Amazon and click your competitors listing. You should see a page like this:
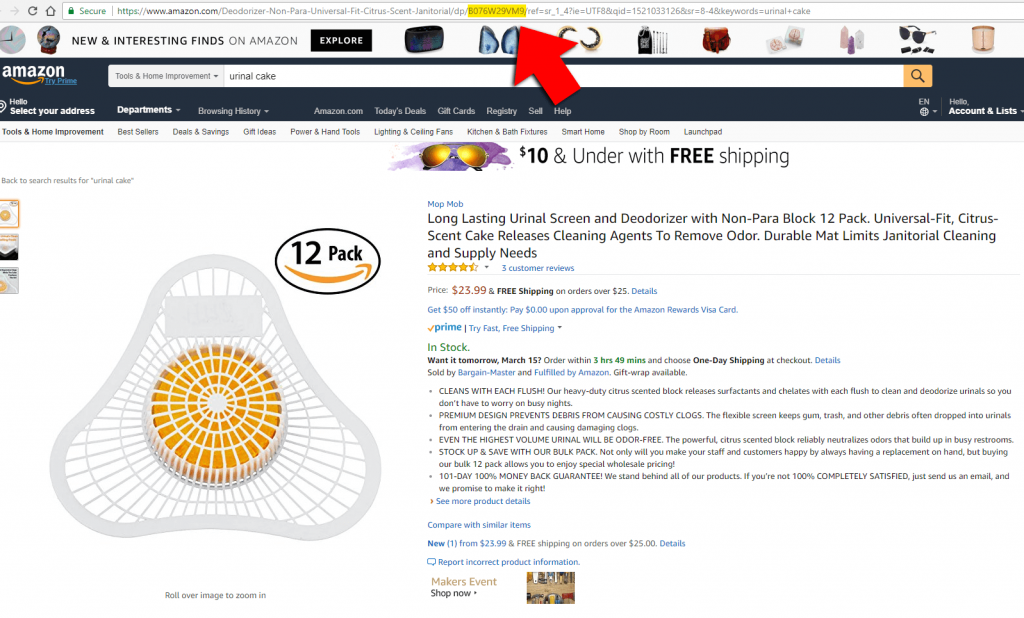
ASIN is the number in the address bar, after dp/ and before another forward slash /. In our case it’s: B076W29VM9. Copy it, and paste it into the Amazon calculator:
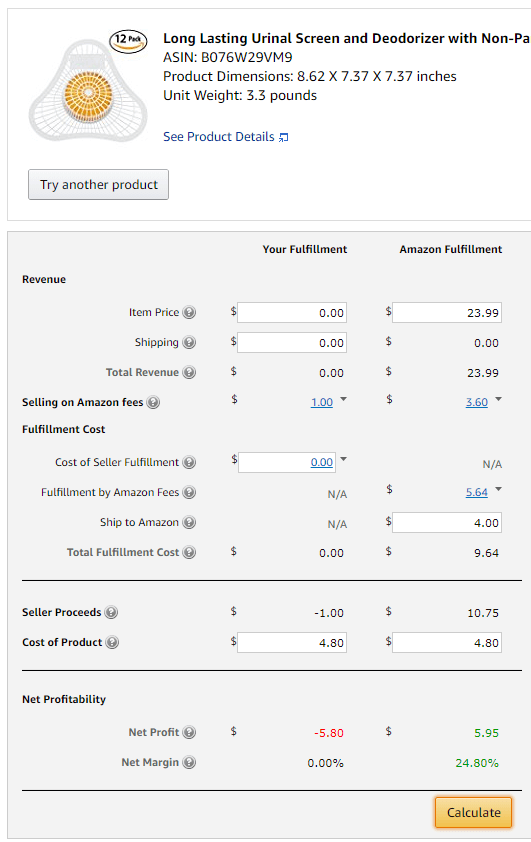
We know the price of the item, we know rough cost, but we don’t know the shipping until we contacted manufacturers to get the quote. I would guess it’s around $4 maybe.
With basic data, we get the 24% ROI or margin of profit you can make from one such unit.
You can do this with multiple products on the first results page to gauge how much profit you can make form one or another product type in the niche.
Product Tracking Using 999 Method
If you haven’t heard already, there’s this trick to calculate how many units your competitors are moving on Amazon FBA. You simply add the product to cart and in the cart, change quantity to 999 like so:

It returns 89. Meaning as of today, this competitor has 89 products available. What you need to do is come back tomorrow, roughly at the same time, and enter 999 for this product in your Amazon’s cart again. You may get a lower number, like 79. If you do this for a week, you may see consistently lower numbers each day. It means that this competitor is selling daily.
Do this with 5 or 10 competitors in the niche and you’ll know exactly how many sales they’re making.
Keep in mind that sometimes you see higher number than previous day. It could be that they bought more inventory. If you see drastic drop, then drastic increase, it could mean that Amazon is moving their inventory around to other warehouses.
Other times, you may not see more than 1 or 10. That means seller has put a limit on the nr. of items you can add into your cart. Then just move on to the next seller.
It’s not ideal, but it beats any tool’s estimations. You can see in real-life data how many sales your competitors are doing. It’s priceless.
Finding Suppliers in China, What to Look For?
This is pretty straightforward.
As everyone suggests, when you go to Alibaba, type in the keyword of what you’re looking for. Make sure to tick TA and GS. This will filter out less trustworthy suppliers. You can also filter by MOQ or price.
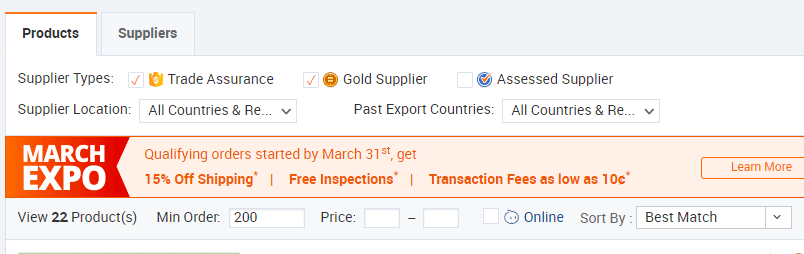
Sometimes you won’t find MOQ from larger suppliers, so you may need to go to resellers who offer min order quantity of 50 or 100. They may not have Gold Supplier status so riskier, but you could get lower quantity for less. It’s up to you. I haven’t had any issues with Chinese suppliers thus far.
Steps to Create a Listing & Shipping Plan on Amazon
I won’t go into details here on how to write the perfect headline, description and so on. We’ll cover that in future guides. I just want to take you by the hand and show you step by step, how to setup your listing. Technical aspect if it first. You can adjust the details later.
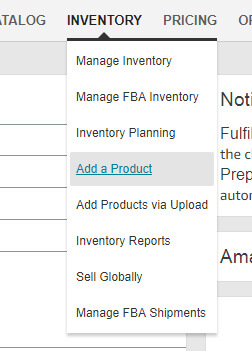
- Click Inventory > Add a Product
![]()
- Do not start typing someone else’s ASIN into the search bar. I don’t know why Amazon makes it seem like it’s the default option. What you need to do is create a new product listing.
![]()
- On the next page you choose your category either by searching for keywords or just selecting from given categories below.
- Next, enter the details of your listing. This should be self explanatory so I won’t go into much detail.
![]()
One thing to note here is the Product ID. This is the only time you’ll need a UPC when selling on Amazon. In order to get UPC, just buy them cheap from some websites like BarcodeMania or Cheap-UPC-Barcode.These are not standard GS1 codes. So far Amazon seems to allow them. But they may require all of the sellers to register the real GS1 codes, which are more expensive. Cheap ones can cost less than a dollar. Real GS1 costs $250 for 10 barcodes + $50+ each year for a license renewal. (Not fun, but if Amazon will push this on everyone, that’s what we’ll have to deal with. Not the end of the world anyways.)
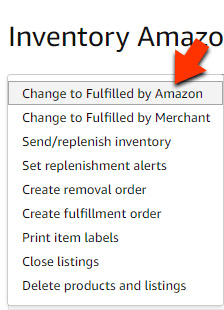
- When you finish creating the product, from your inventory page, select the product and click a button above: “action on 1 selected”. And choose to Fulfilled by Amazon.
![]()
By default Amazon creates Fulfilled by Merchant listing. Meaning you will be doing the shipping and handling for customers. But we don’t want that. We want Amazon to do FBA shipping, so it’s faster for customers with Amazon Prime and hands free to you.
- When you click to convert the listing to fulfilled by Amazon, you’ll first need to choose the barcode type. Select Amazon barcode.
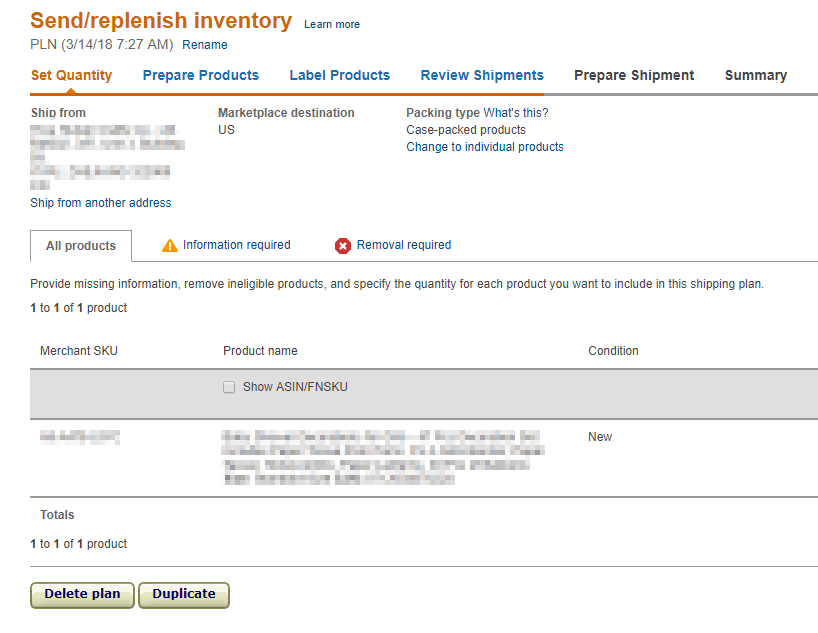
- Then you’re taken to the shipping plan creation stage. First thing you do is create the ship from address. This will be your Chinese manufacturer’s company and address.
![]()
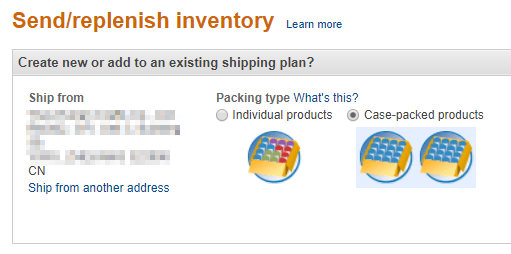
- Then choose a packing type. If you’re shipping from China, it’s most likely case-packed.
![]()
- After than, your product may be under hazardous materials review. You may need to wait up to 4 days for them to review that. In most cases you don’t need to do anything. Just wait.
You may ask, how can they tell what product I’m planning to sell if they haven’t received it? Good question. I assume they look at your product name, description and images. So be sure to put something up there that would give them clear understanding of what you’re selling.
- Choose who preps the products. Most likely it’s Chinese manufacturer, so set this to Merchant.
- Next is printing labels section. If you choose Amazon, then you won’t have any labels to print. Amazon will print them on your boxes for $0.20 a piece. Or you can have your Chinese manufacturer print labels and stick them on each product. In this case, you’d choose Merchant. Click the print labels button and be presented with a PDF file. Send this PDF file to your supplier in China and they’ll take care of it for a small fee. Usually smaller than Amazon’s.
This will be essentially Amazon’s barcode (FNSKU). As we mentioned earlier, you don’t need your UPC barcode anymore, only once when creating the listing.
- In the View Shipments tab, you’ll see your shipping plan. Click on Work on Shipment.
- You’ll be taken to prepare shipment tab. Leave “Small parcel delivery (SPD)” as is. Choose shipping carrier. If you know what your supplier uses, choose that, otherwise select “other”. In shipment packaging section, you’ll be able to enter nr. of units as well as boxes in your shipment. Also enter the box weight and dimensions. Get all this info from your supplier. You’ll need:
- Each unit dimensions
- Each unit weight
- Each box dimensions
- Each box weight
Now, lastly you’ll need to get the box shipping labels. As you’ve figured out, these labels will go on your boxes. So in previous steps we chose labels for each product package/unit to be printed either by Amazon or your manufacturer. Now, you’ll need to your supplier to print these box labels. So download them in PDF file and send them to your Chinese supplier and tell them to put it on the box.
- Click complete shipment and you’re done.

It may seem a lot and confusing at first, but after a few times you’ll find this process very simple.
Now that you have created your first listing and are waiting for your product to arrive at Amazon’s warehouse, you can polish your listing. Write a proper headline, description, bullet points, set the right pricing and so on.
The most important part of a listing, I’d say is the image. So let’s briefly go over that.
Professional Product Photography
Poor quality image can destroy your listing. Simply put, nobody will want to buy if your image looks poor quality and amateurish. Amateur images may work on media buys, but not on Amazon. They’re pushing for clean professional look. That’s why they have a requirement that first image on the listing (main one) would have white background. I believe they even managed to trademark product photos with white background.
Anyway, you’ll probably want to hire photography expert on Fiverr. It can cost from $20 to $1000 bucks for 3 to 10 images. Start with cheap, high rating providers on Fiverr or Odesk. See their quality of images before hiring them.
Compare an oil diffuser photo like this:
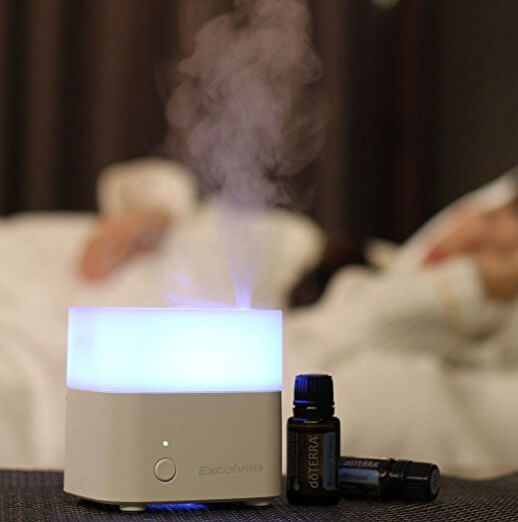
With something like this:
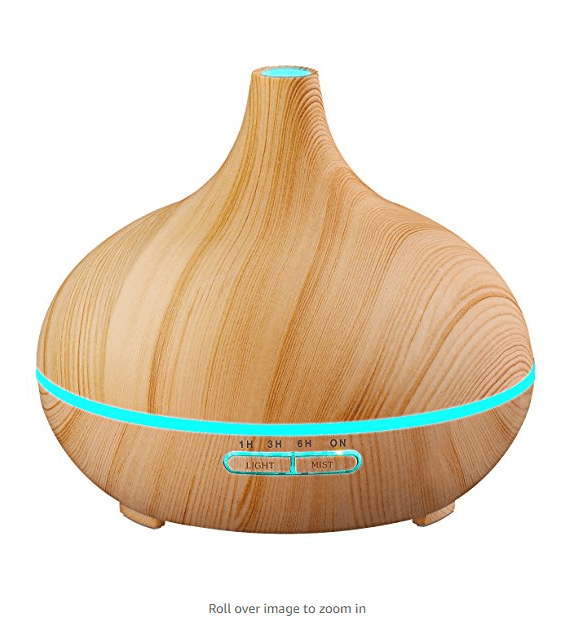
Which one would you want to buy?
A lot of times, these sellers just use Chinese supplier photos. Actually, often times, Chinese sellers are the ones competing on Amazon as well. You can usually tell by not so perfect English on the listings.
So there’s an easy way to differentiate yourself and be more professional. Invest in higher quality imagery. It’s a must for a good listing on Amazon.
Getting Those Reviews
We all know that social proof is important. Well, on Amazon it’s crucial. You have to get those high star ratings on your product listing in order to sell.
So what to do?
Many sellers ask their friends and family to buy the product and leave a great review. Amazon has forbidden to use incentives for reviews. You essentially cannot offer an incentive, a favor in return for a good review. (Not sure why that was even allowed up till now). But many folks don’t really care. Clearly asking family members with same last name is not smart. Friends – you can get away with.
Popular method still (although again Amazon’s TOS) is using FB groups. There are plenty of Facebook groups where you join, ask for a good review and later refund them money via PayPal.
Problem with these groups is they’re dominated by Chinese sellers. There’s literally higher supply than demand. I haven’t gotten much use from those groups. In fact, it’s a good way of spying on your competitors, to see what they’re pushing.
What is allowed and what you should do is contacting your customers for a review.
There are tools like Jumpsend and Zonmaster. These are autoresponders for Amazon FBA. You write a short sequence of messages to your customers in order to get a review. You can search for message sequences on Youtube or Google, (or DuckDuckGo).
Now you can advertise on Facebook, Adwords, Instagram, or any other way, using coupons, giveaways, other discounts available. Give people a reason to buy, and once they do, send them autoresponder series trying to get their review.
Conclusion
Remember that everything costs money. And Amazon FBA is no exception. You will need to spend money on advertising, getting reviews, getting rankings. That’s how this game is played.
Good news is, when you find that first successful product, it becomes so much easier from there. Getting the first affiliate commission, CPA sale, generating the first lead or finding that first golden Amazon opportunity is always the hardest. But once you do, it becomes the numbers game. A matter of scaling what works.
Hope this guide was useful to you. If you like, please post comments, share on social media and so on. I’ll cover more about selling on Amazon FBA in the future.