

Discover How to Start Screencasting Using Free Tools Online and Put Your Screencast on RSS Feed
Maybe you’ve seen screencasts in action yourself while browsing the internet. Some marketer use screencasts quite often to demonstrate one or another trick on how to make money online, drive more targeted traffic or do a sneaky keyword research. But first, let’s find out what screencasting actually means.
Screencast is a recording of your computer screen output. It is simply a movie of what you see on your computer screen. For example, if you move your mouse, type in a few symbols, open a video or do anything else on your screen, a special software records that and allows you to save the video file, which is called a screencast.
Screencasting is usually used for demonstrating various software features, training employees how to use one or another program and so on. Recently many internet marketing experts started using screencasts for demonstrating their own software capabilities, how to use some online services or money making systems.
Keep in mind that most screencasts contain audio, so people could better understand what the screencast is explaining to them. If you’d like to create a screencast with an audio (recommended), then you’ll need to get a microphone at your local store.
Recording a Screencast with Camstudio
The first thing you need to do is download free software called Camstudio for screencasting. After you download this tool, unzip it and install into your PC. After you click on the Camstudio icon, you’ll see a widow that looks like this one:
Now you can make few adjustments to your screencast before you actually record anything. Go to:
Options > Video Options
After the “Video Options” windows pops up, you’ll be able to choose the compressor, adjust the quality and framerate of your screencast.

You should change the quality setting to 70 (if it isn’t by default) and adjust the framerate according to your needs. If the framerate is set to maximum, then your 10 second .avi file can be as large as 2Mb. If you move the framerate bar to the middle, the same 10 second file can be as small as 600Kb. However, keep in mind that if you lower the framerate, your video will capture every 166 milliseconds, which means that your movie will “lag” (record every other second or so). So later, try to play around and see what works best for you.
You can also choose to show you cursor or not. If you do not want your screencast to record your moving mouse cursor, you can turn it off. Simply go to “Options” > “Cursor Options” and then choose “Hide Cursor”.
If you are using your microphone to record audio, go to “Options” and choose “Record Audio from Microphone” as shown below:
If you do not have a microphone, then choose “Do not record audio”. However, if you want to create a useful screencast, you should include audio.
Finally, after you’ve finished adjusting all the settings, go to “Region” tab and choose one of the following. If you choose to record full screen, then your video file will be very large. You can choose “Fixed Region” and set the width and height of the movie. Or you can choose “Region” and determine the size of your recorded area by dragging your cursor after you press the record (red icon) button. After that your screencast recording will start.
![]()
![]() You can change the recording window position by pressing and dragging green edges.
You can change the recording window position by pressing and dragging green edges.
When you press “Stop” button, the recording of your screencast will stop and a window will popup prompting you to save your recorder file. Simply type in the name of your video and click “Save”. You’ll be able to save your .avi file for screencasting with RSS. However, you can record a screencast and put it on the internet as a Flash movie.
Putting Screencast on the Internet
Look at the button on the main window called “SWF” as shown in the picture below.
When you press that button, the icon on the top right will change from “Record to AVI” into “Record to SWF”. That means that you can record a screencast and put it on the internet very easily. Now set the icon to be “Record to SWF” and record the screencast. The window will pop up, but this time it will ask you to save the movie as .swf file. This is a Flash movie file. Simply give a name to the file and click “Save”. Now go to the directory where the file is stored (it’s probably a desktop). You’ll see that there are two files.
One named “file.swf” and the other just “file”. The file without .swf ending is your .swf file, and the one with .swf extension is actually HTML file that’s full name “file.swf.html”.
Now open up the HTML file called “file.swf”. You might see a notice, which says that Internet Explorer doesn’t show the .swf file for security reasons.


In that case, simply choose “Allow Blocked Content…” and you should see your screencast playing.

One interesting thing you’ll notice is the control buttons below the screencasting that let you pause, stop and play the movie.
Now right click the mouse button (not on the Flash movie file) on the white background and choose “View Source”. You’re going to copy and paste the Flash movie code into your website’s HTML file.
Select the code from <object to </object> elements and press “Copy” like shown below:

Now paste the copied code above into your HTML file that resides on your website. You’ll be able to include your Flash screencast into any page of your website. This way, visitors will also be able to see all the navigation menus, headers and footers that you have on your site.
After you paste the code, save the file and upload it into your server. You’ll also need to upload your .swf file, because visitors won’t be able to see your screencast. Don’t mix the two files you have on your desktop. You need to upload not the file that is named “file.swf”, but the file named “file” without the extension. The .swf file is really HTML file, and the real sfw file is the other. Remember to save the HTML file and SWF files into the same directory of your site.
Now go to the web page online where you’ve inserted a code and you should see the screencasting. That is all for inserting your screencast into HTML. Now it’s time to learn how to insert the screencast into your RSS feed.
Inserting Screencast into RSS Feed
You should keep in mind that you won’t be able to edit your files with Camstudio program. That means if you create a screencast and save it as .swf, you are not gonna be able to convert it to .avi, at least not with Camstudio, but you can do that by downloading a free tool called SWFAVI Converter.
If you want to insert your screencast into RSS feed, you’ll have to save your video files as .avi (not as .swf), because you’re going to convert the .avi file into .mp4 file that is suitable for vodcasting (playing videos on RSS feeds with iPod and similar devices).
Assuming that your screencast is already recorded and saved using AVI format, you should download a free tool called Videora. If you have read the article on how to create a vodcast, you’ll know that Videora is used for converting .avi video files to .mp4 video files that can be inserted into RSS feeds.
After you install Videora iPod Converter, open it up and go to “Convert” section. You’ll see a window, like the one below. Simply click on “Transcode New Video”, then choose your .avi screencast and after you open your screencasting, click “Start” to begin converting.
You can also go to “Setup” section and choose the quality of your video file. If your video becomes quite large, you can reduce the size by lowering the quality setting (keep in mind that the quality will decrease too). After the conversion is done, go to Videora folder in “Program Files” (or some other place you have installed it) and look at your screencast converted to .mp4 file format. If you have iTunes installed on your PC, you can watch the video.
Now, when your screencast is ready for RSS, it’s time to make the RSS file with special enclosures. In order to put your created screencasting into RSS feed, copy the following XML code and put it into a text editor.
<?xml version="1.0" encoding="UTF-8"?>
<rss xmlns:itunes="http://www.itunes.com/DTDs/Podcast-1.0.dtd" version="2.0">
<channel>
<title>Your Vodcast Title Here</title>
<itunes:author>Your Name</itunes:author>
<link>http://www.domain.com</link>
<description>A description of your vodcast.</description>
<itunes:subtitle>A subtitle for your vodcast.</itunes:subtitle>
<itunes:summary>A summary of your vodcast.</itunes:summary>
<language>EN</language>
<itunes:owner>
<itunes:name>Your Name</itunes:name>
<itunes:email>[email protected]</itunes:email>
</itunes:owner>
<category>Any Category Here</category>
<itunes:category text="Any Category"></itunes:category>
<item>
<title>Your Movie Title</title>
<itunes:author>Your Name</itunes:author>
<description>A description of your movie</description>
<itunes:subtitle>A subtitle about your movie</itunes:subtitle>
<itunes:summary>A summary of your movie</itunes:summary>
<enclosure url="http://www.yourdomain.com/movie.mp4" length="10940416" type="video/mp4" />
<guid>http://www.yourdomain.com/movie.mp4</guid>
<itunes:duration>00:05:38</itunes:duration>
<itunes:keywords>keyword1, keyword2, keyword3</itunes:keywords>
</item>
</channel>
</rss>
Change all the information between opening and closing tags with your own. It is used by mobile devices, like iPod or special RSS readers that play audio and video files, called Podcatchers.
One important thing to note is that you should put the exact file location between enclosure tags (that are bolded for you). Leave the type to “video/mp4”. And lastly insert the correct length of your screencast file. It is the size of your video. Right click the screencasting video file (that resides in Videora folder) and choose “Properties”.

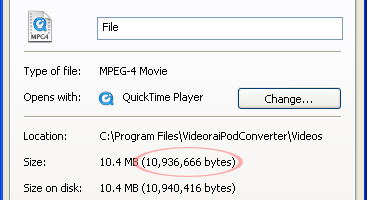
Copy the file size of your screencast in bytes and paste into the enclosure tag. Then simply remove the commas. The video file length is necessary for RSS feed validation.
Now save the text file as “vodcast.xml” and upload into your web server. Upload the video (in converted .mp4 format) and the feed. Now, whenever someone with iPod decides to subscribe to your RSS feed, they’ll be able to download and watch your screencast video on their devices. People who have Podcatchers can also subscribe, download and watch your video. Here’s a list of Podcatchers for you in case you don’t have iTunes on your PC.
In Conclusion
Screencasting is a great tool for marketing. You can not only teach your RSS subscribers some marketing tactics or how to use one or another tool. You can also show them how to use the software that you are selling, or reselling. This way people can easier understand what this is all about and more likely to buy from you.
You can also record a dozen of screencasts revealing people valuable information and sell those screencasts on your website. As you can see, screencasting is great tool. When combined with vodcasting it enables you to keep close contact with your readers and even strengthen their loyalty for your business.