
Tutorial on How to Make Vodcast and Provide Video to Your Website Visitors
So you’ve decided to make a vodcast for your site? If you have read an article about vodcasting, you already realize the benefits of having your own video files on your site. You can actually talk to your readers and literally show them how to accomplish one or another task. And if you think that video podcasting requires lots of money and time, then you’re wrong. It’s very easy to do.
There are lots of vodcasting software packages being sold on the internet that cost up to $500 or even more. However, you do not have to buy any software in order to record and publish a video podcast on your site. We’ll cover free tools that will help you start vodcasting. But there’s still a little investment involved. You’ll also need to buy a webcam and a microphone if you want to create a vodcast. So let’s wrap it up and see what you need.
- Webcam – Cheapest webcam costs about $20. However, if you can afford, you should buy some more expensive webcam that has higher video quality and more options.
- Microphone – There are microphones that come with webcams, however their sound quality is very low. You should invest some money and buy yourself a decent microphone if you’re planning to vodcast.
- Free Software – Finally, we’re going to use software that comes under GPL license. It means that it’s open source and you can freely use it for your needs.
That’s all you gonna need for creating a vodcast and including it into your RSS or Atom feed.
Recording Video File
Assuming that you’ve bought a webcam and microphone and set everything up on your PC, we’ll go to the next step, which is recording a video file. First thing you need to do is download free software, called VirtualDub. This free tool will allow you to record a video using your webcam. You can record yourself or anything else with your web camera.
Once you download VirtualDub, unzip it and open the file. You do not have to install anything. When the program is opened, press:
File > Capture AVI…
Then make sure that the right device is selected by clicking the “Device” button. 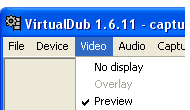 It should be your webcam. In the “Video” section you can also adjust the compression of your video file. Actually, you better use no compression in the beginning (later you’ll discover why).
In the “Audio” section make sure you choose the right audio source for your video file. If your webcam has a built-in microphone, then you might see few choices. Better choose your sound card as your audio source, it usually has better sound quality then a webcam. In the “Capture” section, press “Settings” and adjust the frame rate of your video file.
After you’ve made all the adjustments, go to:
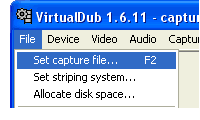
File > Set capture file
You’ll have to enter the name of your video file and also put the .avi extension at the end.
If you record more than one session, VirtualDub will make other video files next to the one you’ve made. Let’s say you type in the file name “video.avi” and record a video. If you stop recording and then record again, you’ll see that there are actually two files “video.avi”and “video1.avi”.
But let’s get back to the recording. After you’ve named your file, go to “Capture” section and press “Capture Video” or “F5”. This will start the recording. One disadvantage is that, you won’t be able to see live preview of your video recording on the screen using VirtualDub. When you want to stop the recording, go to “Capture” section and press “Stop Capture” or press “Esc”.
That’s it. Your first video is recorded. You can play the .avi video file, by pressing:
File > Exit Capture Mode
Now the next step is resaving (compressing) the file so we could squeeze it a bit. That is why you had to choose no compression in the beginning. However, the file size is little too large. So if you want to put it on the internet, you gonna have to compress it.
If your file is still open, go to “Video” section and press the “Compression” button. In the dialog, make adjustments like shown in the image blow:
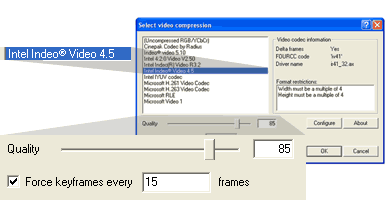
You can decrease the quality as much as you want until you are satisfied with the file size and the quality of your video.
You can also adjust the frame rate of your video. It means how many pictures are taken per second. If you want low quality, but small movie, choose 15. If you choose 25 or 30 fps, then your video file quality will increase along with the file size. Play around and see which settings are best for you.
Now go to “File” and press “Save as AVI”. Choose some other name than your original (uncompressed) file, like “myfile.avi” and click “Save”. Look at the file and see if you’re satisfied with the results. If it’s ok, we’ll go to the next step, which is converting your video file to be compatible for vodcasting.
Converting Video File for Vodcasting
You already have your .avi video file. However, you won’t be able to use it for vodcasts, because the format is not supported. Such devices as iPod supports .mp4, .m4v, .mov file formats, but not .mpeg or .avi. So you have to convert your existing file into the correct file format.
In order to do that, you have to download a free program called Videora iPod Converter. This program converts your .avi files into .mp4 format video files that can be played on iPod devices.
Once you download and install Videora into your PC, open it, press “Convert” and then click “Transcode New Video” button. After that, you’ll have to choose your .avi video you have recorded with VirtualDub and press “Open”.
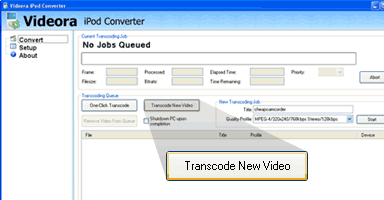
Then, press the “Start” button and the conversion will begin. After that, go to the folder where Videora’s video files are stored and take a look at your video file that is ready for vodcasting.
The file size may be quite large. In that case, go to “Setup” section and make some adjustments to the quality profiles, bitrate, framerate. After adjustments your file size can be as your original .avi file or even smaller.
Putting a Video in RSS Feed
The final step is including the video into RSS feed. First, you’ll need to upload your existing .mp4 video file into your web server. Then you’ll have to create an RSS feed. In order to create an RSS feed, you’ll need to open up any text editor (like Notepad). Then copy and paste the following code below into your text file.
<?xml version="1.0" encoding="UTF-8"?>
<rss xmlns:itunes="http://www.itunes.com/DTDs/Podcast-1.0.dtd" version="2.0">
<channel>
<title>Your Vodcast Title Here</title>
<itunes:author>Your Name</itunes:author>
<link>http://www.domain.com</link>
<description>A description of your vodcast.</description>
<itunes:subtitle>A subtitle for your vodcast.</itunes:subtitle>
<itunes:summary>A summary of your vodcast.</itunes:summary>
<language>EN</language>
<itunes:owner>
<itunes:name>Your Name</itunes:name>
<itunes:email>[email protected]</itunes:email>
</itunes:owner>
<category>Any Category Here</category>
<itunes:category text="Any Category"></itunes:category>
<item>
<title>Your Movie Title</title>
<itunes:author>Your Name</itunes:author>
<description>A description of your movie</description>
<itunes:subtitle>A subtitle about your movie</itunes:subtitle>
<itunes:summary>A summary of your movie</itunes:summary>
<enclosure url="http://www.yourdomain.com/movie.mp4" length="10940416" type="video/mp4" />
<guid>http://www.yourdomain.com/movie.mp4</guid>
<itunes:duration>00:05:38</itunes:duration>
<itunes:keywords>keyword1, keyword2, keyword3</itunes:keywords>
</item>
</channel>
</rss>
Almost all the explanations of XML elements used here can be found at Harvard’s Internet Technology web page. A few words about important <enclosure> element.
- Enclosure – This is important part of the RSS feed. It should reflect the exact URL of your video file. Don’t forget to include the exact file size of your file. In this case the size of a video is 10Mb (10,940,416 bytes). You should copy the video file size in bytes, paste it into the enclosure tag and remove the commas.
All these elements are used for iTunes, so people who have iPods can easily download and watch the video files. You can also watch vodcasting videos via iTunes software or a special software called Podcatcher. Podcatcher is like an RSS reader, except it is able to stream the audio and video files automatically.
Summing Up
As you can see, creating a vodcast isn’t hard at all, but it requires a small investment. If you are serious about publicizing vodcasts on your RSS feed, then it shouldn’t be a problem for you to buy a quality microphone and webcam.
In this tutorial we’ve covered how to create a vodcast using free tools (software). However, if you think that these tools lack of features and comfortability, you can go ahead and buy some more expensive software packages that satisfy all your needs.