
Read this WordPress Tutorial on How to Change the Navigation Menu Layout
If you have a WordPress blog and the default “kubrick” theme, then one thing that pops into your mind is the navigation menu. If you browse websites, you usually see navigation on the left side. Most of the blogs however, have navigation menus on the right side. It might seem not very comfortable as long as you and many people are used to click on links that are on the left side.
But it’s not a big problem actually. The theme is designed in a very convenient way so you can stylize almost any element on your blog. In the following tutorial, we’ll go through a simple process of moving your navigation menu from right to left. You’ll understand that it’s not difficult at all.
Finding a CSS File in Your Blog
The first thing you gonna have to do is make a copy of your cascading style sheet file. In case you corrupt the code, you’ll always be able to restore the old style sheet by uploading it to your server.
Go to your blog folder on your website. Then navigate to:
Wp-content > Themes > Default > Style
Keep in mind that in your admin area online, you should select the default blog theme (not “Classic”). Now open the style (CSS file) with a text editor, like “WordPad”. You’ll see a large code. You’ll need to use a search function to find one or another string of the code and edit it accordingly.
Moving Navigation to Left
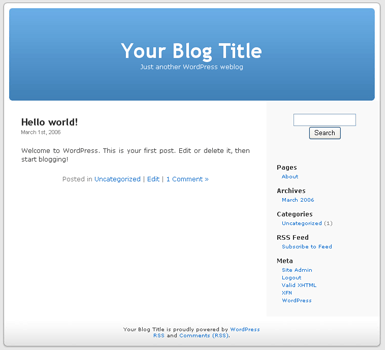
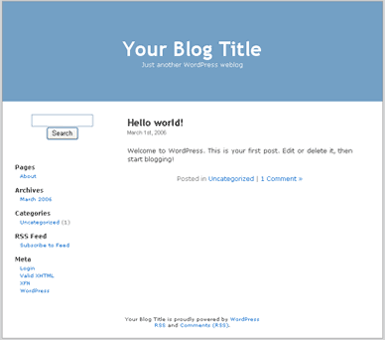
If you have just created your first blog, then you should see something like this (if you’ve chosen default theme):

If you want to move the navigation menu from the right to your left, then you’ll need to change few files in the CSS file. If you’ve made a copy of the CSS file, edit the original one. Find a string of code that looks like this:
.narrowcolumn {
 float: left;
 padding: 0 0 20px 45px;
 margin: 0px 0 0;
 width: 450px;
 }
Simply search for “narrowcolumn” and click “Find Next” until you reach this exact line. Now change that line to this:
.narrowcolumn {
 float: right;
 margin: 0px 0 0;
 padding: 0 45pt 20px 0px;
 width: 450px
 }
You simply change the float from left to right. Then search for “sidebar” and keep searching until you find this:
#sidebar {
 padding: 20px 0 10px 0;
 margin-left: 545px;
 width: 190px;
 }
Now change that above into this:
#sidebar {
 margin-left: 25px;
 padding: 20px 0 10px;
 width: 190px
 }
The “narrowcolumn” style element is actually a posting in your blog, from the title of your post until comments link. Style element called “sidebar” is actually the whole navigation menu style.

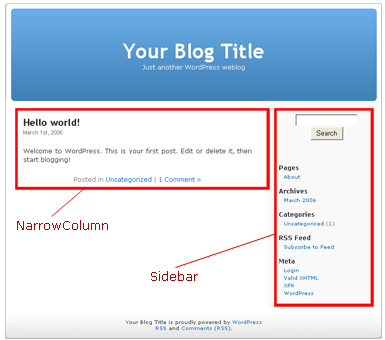
By changing the values given, you simply tell the sidebar to move to the left and then change the column so they fit on the blog page. Now your blog should look like this:

However, you might not like the grey column left on the right side of you blog. You can remove this grey bar and all the pictures from this blog theme and add your own. You’ll simply have a clean blog that loads fast and doesn’t contain any pictures.
All you need to do is navigate to:
Wp-content > Themes > Default > Header
But before that, you should also make a copy of header.php file in case you clutter anything there. Open the original “header.php” file and you’ll see large style sheet code from:
<style type="text/css" media="screen">
to
</style>
This is the internal style sheet file used on every page of your blog. It contains all those images that you can see in the default WordPress theme. Simply remove everything from the beginning style sheet line till the last line. Save the file.
Now go to your style sheet file again and search for “footer”. Search until you find this line:
#footer {
 padding: 0 0 0 1px;
 margin: 0 auto;
 width: 760px;
 clear: both;
 }
All you have to do is simply change padding number from 1 to 0 so it looks like this:
#footer {
 padding: 0 0 0 0px;
 margin: 0 auto;
 width: 760px;
 clear: both;
 }
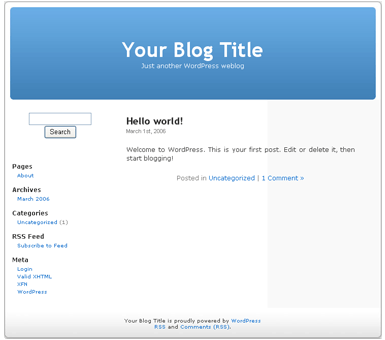
This is needed to eliminate an ugly white line at the right side. Now save this CSS file and upload both files (style.css and header.php) to your server. You’ll see that your blog looks like this:

Ok it may be not the prettiest blog you’ve ever seen, but now at least you have some control over how things look like and how they’re positioned. Only with the help of one CSS file, you can make this blog look pretty good. And with the help of header file, you can add your own images into the blog and make it look awesome.
In Conclusion
Navigation on the website is very important. If a visitor is not able to find what he’s looking for, then he’s more than likely will leave your site. Blog is not different. You’re using blog to make money and attract visitors. So make them comfortable to browse your site, don’t scare them away.
So moving a navigation menu in your blog from right to left, will make your visitors feel more comfortable and might actually increase your overall traffic and sales as long as it will be easier for people to navigate your blog.